Telobal™ is quickly and easily configured via a graphical web interface, with drag-and-drop objects being connected together to define the call flows and the functionality of the PBX.
The components used in building Telobal™ applications are as follows:
- Object - there are a number of different objects, with each object performing a specified PBX function such as voicemail, time routing or conferencing.
- Palette - a menu listing the various objects that are used in building the PBX.
- Workspace - an area where the objects are assembled.
- Workspace Tab Menu - for displaying the different pages of the PBX workspace.
- Cable - used to logically connect objects together.
- Trash - for removing objects from the workspace.
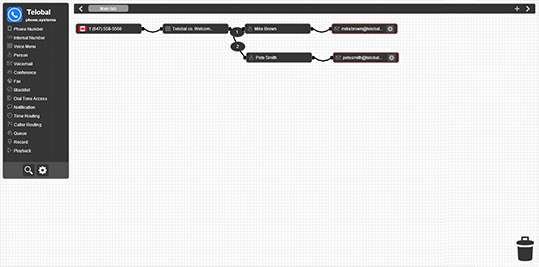
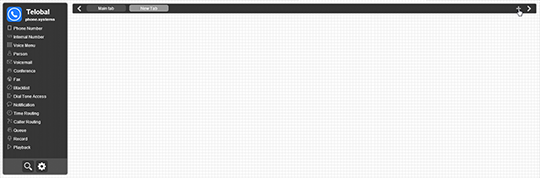
The initial Telobal™ configuration screen consists of four components: the center Workspace where the PBX logic is assembled, the Palette on the left-hand side of the screen, the Workspace Tab Menu along the top of the screen and Trash in the lower right-hand corner.
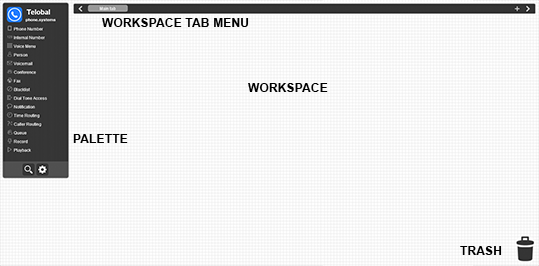
Palette
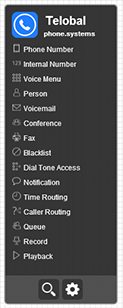
The palette serves as a listing of the various objects that may be used in setting up your PBX. In addition, the palette includes options for searching for configured Telobal™ items such as phone numbers and extensions, as well as an Advanced Settings sub-menu for language selection, Telobal™ Interlink setup, generating the QR code for mobile applications, technical support and more.
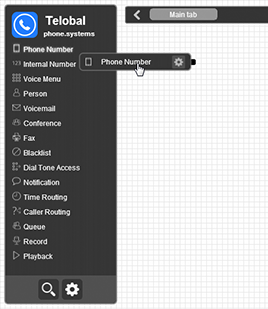
In order to use a specific object, position your mouse over the listed object on the palette until that object is highlighted. Then press the left-hand button on your mouse, dragging that object from the palette and releasing it over the workspace.
Once objects have been positioned on the workspace, they may be dragged and re-positioned as required. Telobal™ also allows you to drag multiple objects around the workspace in groups using a single mouse movement, allowing easy maintenance and modification of complex voice systems. See the section Moving Objects Around the Workspace for further details.
Clicking on the menu option  allows you to search for fields such as names, phone numbers and extensions in previously configured objects, and then locate those objects on your Telobal workspace.
Clicking on the menu option  opens an Advanced Settings sub-menu.
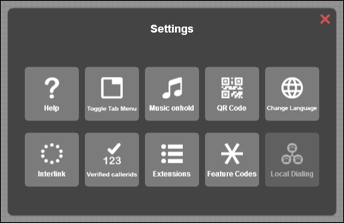
The options for the Advanced Settings menu are:
 Opens a copy of the Telobal™ user guide for a full product reference.
 Toggle the visibility of the Workspace Tab Menu at the top of the Telobal™ worksheet.
 Create, modify and delete playlists that are used when processing incoming calls. Playlists consist of pre-recorded music, commercials or any other messages that may be played to the caller while they wait for their call to be answered.
  Display a QR (Quick Response) code that is used when configuring PBX mobile applications.
 Set the language for the Telobal menus, with the options being English, French, Spanish, Portuguese, Russian or Hebrew. Note that the default language used by Telobal is configured in your account preferences.
  Securely interconnect to other Telobal™ voice systems via the Interlink feature. You will be able to directly and transparently dial out to internal numbers on other Telobal™ accounts, just as if you were on the same PBX system. To connect to another Telobal™ account, follow the on-screen instructions to generate an Interlink Authorization Code in your panel, and then provide this code to the administrator of the remote Telobal to which you wish to connect. Alternatively, you may enter an Interlink Authorization Code that has been supplied to you.
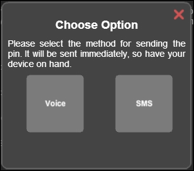
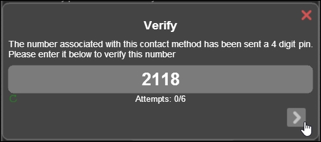
 Verify the Caller ID, so that a previously configured land or mobile phone number may be used as the Caller ID that is displayed when making outbound calls from IP phones. A 4-digit PIN will be immediately sent to the selected land or mobile number, either as a voice message or an SMS. Once you have received the PIN information, it should be entered in the verification window.
 Display a list of all the currently configured extensions (internal numbers).
 Display the feature codes for Telobal, such as *1 for blind transfers and *98 for voicemail management.
Note that the Palette menu may be minimized in size by clicking on the Telobal™ logo at the top of that menu, resulting in a larger workspace. Clicking on the Telobal™ logo of the minimized Palette restores that menu to its full size.
Workspace
Objects are placed onto the workspace and are subsequently logically connected by cables in order to build the required voice system. Each object may be individually moved around the workspace, or multiple objects may be dragged around the workspace in groups.
Detailed information regarding advanced workspace techniques is found in the section Moving Objects Around the Workspace later in this user guide.
Workspace Tab Menu
Telobal™ allows you to split up your voice system into logical groups and functions that may be arranged over multiple workspace pages. This capability is very useful when building complex voice scenarios, such as a PBX for a multi-branch business. The various workspace pages are accessed via the tabs on the Workspace Tab Menu, and the tabs may be added or deleted as required. In addition, the tabs may be labeled so as to define the functionality of each workspace page. Note that when Telobal is initially activated, there is a single tab denoted as the "Main Tab". This tab may be renamed, but cannot be deleted.
More information regarding this capability is detailed in the section The Workspace Tab Menu and Multiple Pages later in this user guide.
Trash
Trash allows you to delete objects that have been previously placed on the workspace. Drag any object over the trash and then release it in order to delete that item.

Note that a counter of the number of items currently in the trash is displayed (in this case  ).
).
The trash has a recycle facility, where the last 25 items placed in the bin may be recovered. By clicking on the trash, you may scroll through the deleted items by clicking on the left and right arrows, and recover selected objects by dragging them from the trash back onto the workspace.
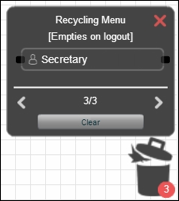
The  button serves to permanently delete all objects that are currently in the trash. Note that the trash is emptied on logout, and deleted items may not be recovered on the next login.
Objects
There are number of different types of objects, each performing a specified function or set of functions. Telobal™ objects may be arranged and inter-connected in a wide variety of combinations, with calls being passed from one object to another as required.
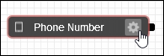
Objects are dragged from the palette onto the workspace, and once an object has been added to the workspace, it must be configured. Note that unconfigured objects have red borders so as to indicate that user configuration is required before this object is functional.
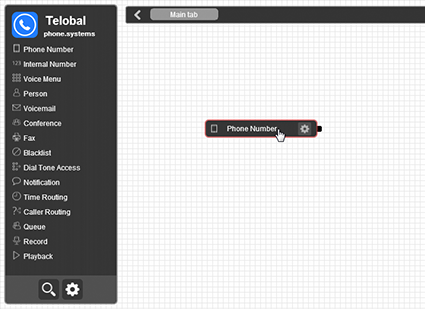
To configure the object, click on the “configure” icon  (found on the bottom right corner of that object) and enter the required information.
Configuration options for all objects are specified in the next section of this document.
Each object contains either one or two sockets which are shown as small protrusions on the left and/or right sides of the object.
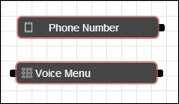
These sockets are used for connecting the objects together via cables.
Cables
Cables are used to logically interconnect the objects that have been placed in the workspace area, thereby defining the call flows and the functionality of the PBX.
To create a cable, click the right-hand socket of an object. A cable will be created, and this cable will follow your mouse pointer around the workspace.

In order to connect two objects together, place the pointer with the attached cable over the left socket of the destination object and click on that socket. The objects will now be logically connected as required.

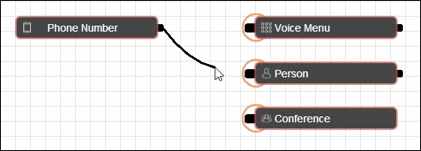
IMPORTANT - Telobal™ includes an intelligent cabling configuration assistant that serves to simplify the connection logic between voice objects by indicating possible cable attachment points. In the figure below, once a cable has been generated from the Phone Number object, all valid connection options are shown by means of "radiating circles" originating from those sockets. The cable may be connected to any one of these sockets.
To redirect a previously connected cable (i. e., connect that cable to a different object), place the mouse pointer over the cable until it changes color, and then click on that cable. The cable will now become detached and may be "dragged" and connected to other objects.
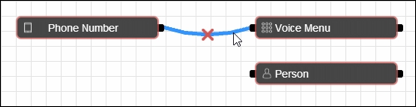
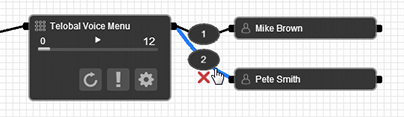
To permanently remove a previously connected cable, place the pointer over the cable, until it changes color and an "X" symbol is displayed at the centre of the cable. Click on the "X" symbol, and the cable will be deleted.

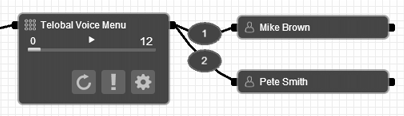
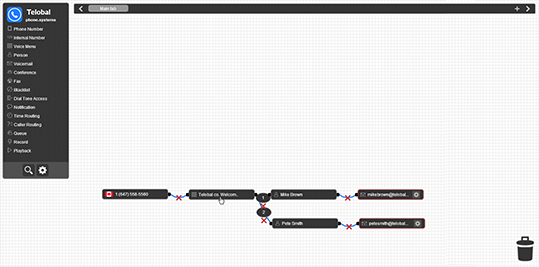
In some case, the cables exiting the object (on the right hand side of that object) have additional functionality over-and-above forming connections between objects. For example, when connecting a voice menu to other objects, the cables exiting the voice menu object are automatically allocated extension numbers (shown as a number in a circle on each cable). This allows you to define how calls should be forwarded according to the extension number entered by the caller according to the pre-recorded voice prompt.
In the illustration below, once the voice message has been played, if the caller presses “1” then the call will be forwarded to Mike and if “2” is pressed, then the call will be forwarded to Pete.

Note that the extension number may be changed by clicking on the cable number and then entering the required extension number information.
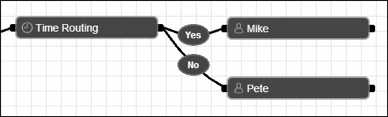
Similarly, when using time or caller routing objects, the two cables exiting the routing object form part of the “Yes/No” decision logic. The “Yes” option defines the routing of calls if a time or caller match occurs and the “No” option defines routing in the case of a match failure.
In the illustration below using a Time Routing object, if the incoming call is received within the configured day/time parameters, then the call will be forwarded to Mike. Otherwise, the call will be forwarded to Pete.
Object Configuration
Calls are passed from object to object, with each object performing a specified function or set of functions. By interconnecting these objects, Telobal will fulfill almost any need that you may have on your virtual PBX system.
The functions and configuration options for the different types of objects are detailed below.
Phone Number
The Phone Number object is configured with a virtual number on which incoming calls are received.

The information to be entered for this object is:
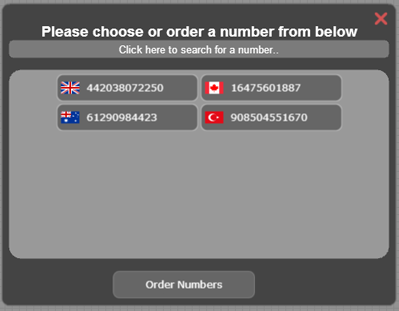
- The virtual number. When you open the Phone Number object for configuration, a list of previously purchased, unused virtual numbers (DIDs) will be displayed (including country and area codes). You may click on any of these phone numbers to select the virtual number that must be allocated to this object. Alternatively, you may use the search option to find a virtual number in the case where many numbers are listed.
Note that a single phone number should be selected for this object.
A simple usage example of the Phone Number object is shown below, where incoming calls are forwarded to a Person object “Mike Brown”. Note that the appropriate country flag is displayed on the Phone Number object.

Internal Number
The Internal Number object is used for internal dialing and is applicable to SIP networks. This facility allows users to call each other directly and to reach selected objects (such as conference and voice menu objects) via internally-assigned extension numbers. Note that one Internal Number object must be created for each internal extension required.

The information to be entered for this object is:
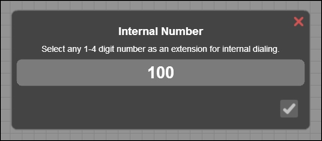
- An internal number (extension number) that will be used for internal dialing (1 to 4 digits).
Once an Internal Number object has been configured, clicking on that object allows you to designate this internal number as 'public' or 'private'.
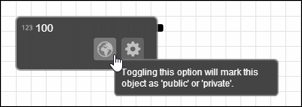
If the  symbol is visible (the default option on object configuration), then this internal number is public and is visible to and may be used by all instances of Telobal™ that are interconnected via the Interlink feature. Alternatively, the internal number may be designated as being private by toggling to the
  symbol. In this case, the internal number is only visible to and usable by the current instance of Telobal™.
A simple usage example of the Internal Number object is shown below, where an internal extension number 100 is used to call the Person object “Mike Brown”. Note that in this scenario the Internal Number object is used in conjunction with a Phone Number object, so that “Mike Brown” may receive calls from both Telobal users via the SIP network, as well as from callers on the external PSTN network.

Voice Menu
The Voice Menu object is used for implementing an IVR (Interactive Voice Response) or automated attendant system. The Voice Menu plays a recorded or uploaded message, and prompts the caller to enter an extension number. The call is then passed to the connecting object with the matching extension number.

The information to be entered for this object is:
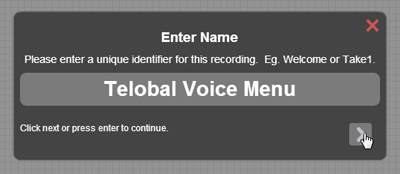
- The name of the Voice Menu.
- A voice message that may either be recorded directly, or may be uploaded from an existing file. Typically this message would include information pertaining to extension numbers that are to be pressed by the caller in order to connect with people or departments.
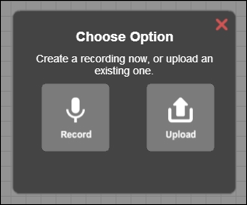
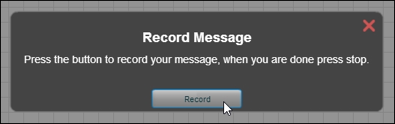
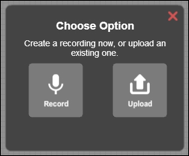
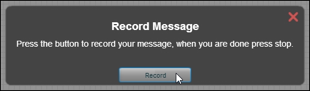
In order to record a message, follow the simple instructions shown.
Alternatively, a voice message in .mp3 or .wav format may be uploaded.
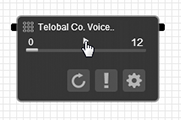
Once the voice message has been recorded or uploaded, its length (in seconds) will be displayed on the right-hand side of the configured Voice Menu object. To play the message back, click the arrowhead icon seen on the message timeline.
Voice messages may be changed by clicking on the “configure” icon and re-recording the message, or uploading a new voice file.
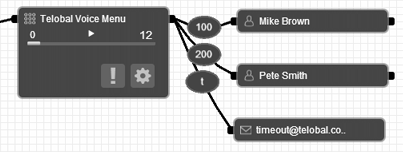
It is important to note that cables exiting from the right-hand socket of the Voice Menu object that are to be connected to other objects are automatically numbered when they are generated. These numbers correspond to the actual extension to be entered by the caller in order to reach the required destination. A simple usage example of the Voice Menu object is shown below, where a voice message is played to the caller, with the instructions “Press 1 for Mike and 2 for Pete”.
Cable extension numbers may be changed by simply clicking on the extension number on the connecting cable, and editing that number. In the illustration below, the extension numbers for Mike and Pete have been changed to 100 and 200 respectively. Valid extension numbers are from 1 to 9999.
To disconnect a previously connected cable, place your mouse over the extension number and click on the "x" that appears below that number.
Two additional important call-processing options are available for the Voice Menu object. By clicking on the  icon, the next cable generated from the Voice Menu object will represent the call flow for a call that has timed out (no key is pressed by the caller). For example, such an event may require that the timed-out call be sent to voicemail as shown below.
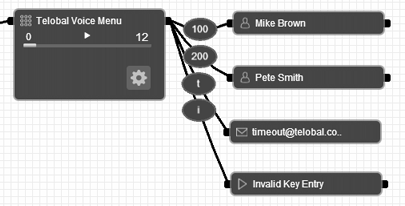
The  icon defines the call flow where the caller provides an invalid key input. By clicking on this icon, the next cable generated from the Voice Menu object will define this call flow as shown below, where the call is sent to a Playback object, and a pre-recorded message is played to the caller.
Person
The Person object is configured with a single or multiple contact methods to which incoming external or internal calls are forwarded. Contact methods include land lines, mobile phones and VoIP, and up to three contact methods may be configured for each Person object.
An important feature of the Person object is the ability to define custom SIP devices. This allows users to call each other directly and to reach selected objects (such as conference and voice menu objects) via internally-assigned extension numbers. In addition, outbound calling may be enabled for custom SIP devices, including the ability to display specific Caller IDs to the called party.
Multiple contact methods may be included as a hunt group within a single Person object, and the ring times for each contact method and the ring sequences for the selected contact methods are fully configurable. If the first contact method is busy or remains unanswered for a set time period, the call goes to the next device, and so on through the list of contact methods. Additionally, unanswered calls may be forwarded to voice mail or other objects.
The Person object includes the ability to configure playlists, so that pre-recorded music, messages, commercials or any other sound clip may be played to callers while they are waiting for their call to be answered.

The information to be entered for this object is:
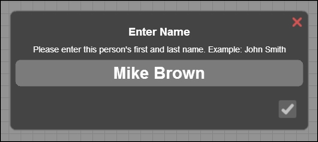
- The name of the person to whom the calls must be forwarded.
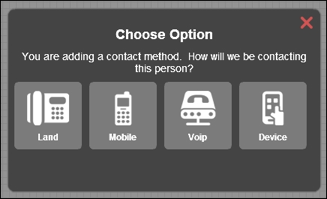
- The contact method, with the options being Land (land line), Mobile (mobile/cellular phone), VoIP (Voice over IP) or Device. Note that the Device option refers to configurable, custom SIP devices.
- A unique name for this contact method. By default, Telobal™ provides a name for this contact method consisting of the name entered and the contact method. In the example shown below, Mike Brown has selected a Land contact method, and therefore the default name provided is Mike Brown-Land. This unique name may be edited as required.
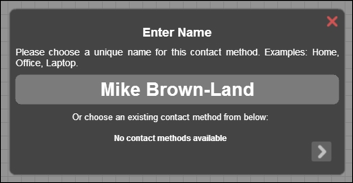
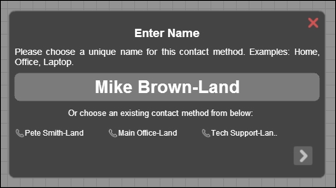
Note that Telobal™ allows you to replicate the details of the selected contact method so as to simply the configuration process. In the above image, there is a informational message "No contact methods available", indicating that no other Person object has been previously configured with the same contact method. However, if other Person objects have been previously configured with the selected contact method, then you may replicate that contact method. In the illustration below, a landline has been selected as the contact method, and all previously configured landlines are displayed ("Pete Smith-Land", "Main office-Land" or "Tech Support-Land"). You may either enter details for a new landline, or you may select one of these previously configured contact methods by clicking on that contact method. Note that if you wish to define new details for this contact method, then click on the  icon to provide further configuration input (in this case, a phone number).
Once you have selected a contact method, you must fill in the necessary information required for that option such as a phone number, SIP URI/SIP device details.
Note that if the Land or Mobile contact methods are selected, the phone numbers must be entered in E.164 format:
<CountryCode> <City/AreaCode> <LocalNumber>
The country code is 1-3 digits long, while the length of the city/area code and local number may vary. Some examples of phone numbers in E.164 are 14162223333 for Toronto, Canada and 60321345678 for Kuala Lumpur, Malaysia.
An important feature of Telobal™ is the ability to use configured land and mobile phone numbers as the Caller ID that should be displayed when making outbound calls from IP phones. This is achieved via the Telobal™ secure Caller ID Verification process. When land or mobile contact methods are added to a Person object, you will be asked if you wish to securely verify this number for use as an outbound Caller ID.
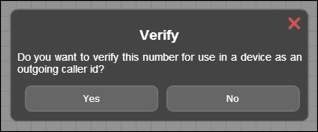
If you select the "Yes" option, then a 4-digit PIN will be immediately sent to you on the configured land or mobile number, selectable as either a voice message or an SMS.
Once the PIN information has been received, then it should be entered in the verification window as shown below. If a correct PIN is entered, then this phone number may be optionally used as the Caller ID to be displayed when making outbound calls from IP phones and mobile devices.
If the VoIP contact method is selected, there are 3 VoIP options: Custom SIP Forward, ITSP SIP Forward and Device.
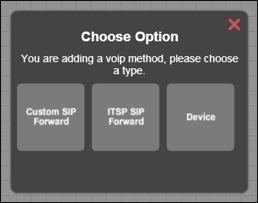
For the Custom SIP Forward option, you must provide a SIP URI. For the ITSP SIP Forward option, you must provide your username for the ITSP, and then select your ITSP from the dropdown menu of supported ITSPs provided.
The Device contact method allows you to define custom SIP devices, implement an internal dialing system, and enable outbound calling using these custom SIP devices.
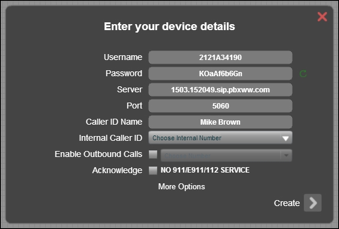
Note that the Username, Password, Server, Port and Caller ID Name fields are automatically provided by Telobal, and these details must be entered in your SIP device. Additional information on configuring SIP devices is found in the section Configuring Softphones for use with Telobal in this manual.
A single Internal Caller ID extension number may be selected from the dropdown menu. This number will be used for internal dialing and will be displayed instead of any virtual numbers (DIDs) that have been selected for display as the Caller ID on outbound calls made on this device.
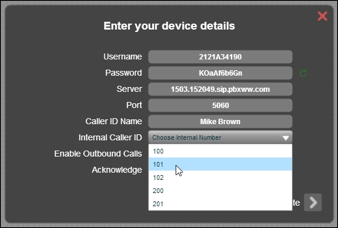
IMPORTANT: The Internal Caller ID dropdown list that is displayed consists of the internal numbers (or extensions) allocated to previously configured Internal Number objects. Therefore, it is recommended that extension numbers be configured using Internal Number objects prior to configuring Person objects.
In order to enable outbound calling via this SIP device, the Enable Outbound Calls option must be selected. A significant feature of Telobal is the ability to select the phone number that should be displayed as the Caller ID when making outbound calls from a SIP device, and such a phone number must be chosen from the drop-down list provided. Note that this list consists of phone numbers allocated to previously configured Phone Number objects, as well as any phone numbers added to Person objects and verified as being able to be used as an outbound Caller ID.
IMPORTANT - there must be at least one configured Phone Number object or verified land/mobile phone number on the workspace in order to enable outbound calling.
There are two options for selecting the Caller ID that is to be displayed on outbound calling:
- If you select a single phone number, then this number will always be displayed as the Caller ID.
- If you select the CLID auto match option, then an appropriate, country-specific phone number will be automatically displayed, depending on the phone number dialed. For example, if you dial out to the USA, then a USA virtual number (if configured) will be displayed as the Caller ID.
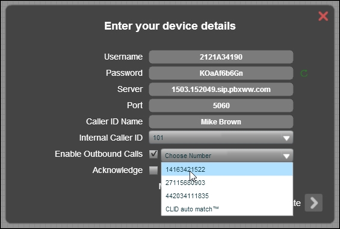
IMPORTANT - Telobal™ does not support emergency dialing. In order for this device to be created and enabled, you must agree to and accept this condition by selecting the "Acknowledge" option.
Additional configuration options are available for the Device contact method, and may be viewed by clicking on the More Options text. These options include call recording and message recording facilities.
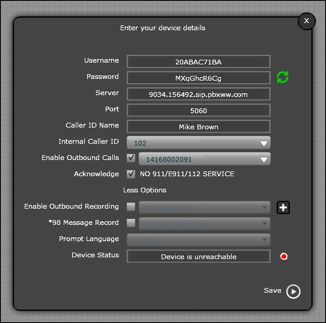
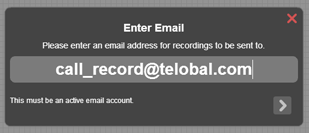
The Enable Outbound Recording option allows all outbound calls made from this device to be recorded. A single, valid email address must be entered to which recordings will be forwarded on the termination of each call. Note that you may select an email address from a drop-down list of previously configured Voicemail and Record objects, or alternatively you may enter an email address by clicking on the '"+" sign.
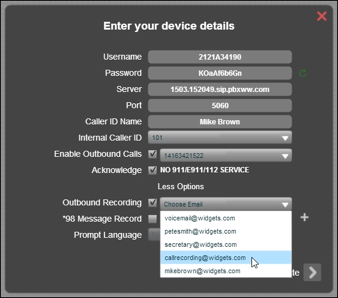
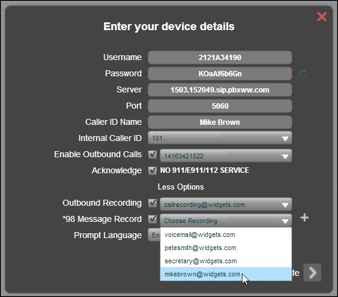
The *98 Message Record option allows this device to access a previously configured Voicemail object, and to modify the voice message on that object. By pressing *98 from the keypad on the SIP device, voice messages may be played or re-recorded, thereby updating the messages associated with Voicemail objects without using the Telobal web interface.
A single email address corresponding to a previously configured Voicemail object must be selected from the drop-down list provided. If this option is enabled, the language for the message recording prompts may be selected (options are English, French, Spanish, Portuguese, Russian and Hebrew).
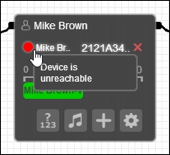
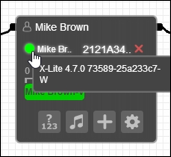
A Person object configured with a Device contact method includes a red/green indicator, signaling the current connectivity status between Telobal and the end device. If this indicator is red, then the end device is unreachable, generally indicating a connectivity or configuration problem. Conversely, a green indicator implies that the end device is connected to Telobal and may be used for voice communications.
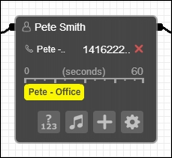
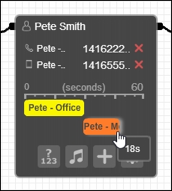
An important feature of the Person object is the ring time/ring sequence options for the configured contact methods. Clicking on a configured Person object displays the object details, including the ring times for each contact method which are shown along a 60 second timeline bar. In the image below, there is a single land-line contact method shown as a yellow “stripe”, labeled “Pete - Office”. The ring time is configurable (between 0 and 60 seconds), and may be changed by placing your mouse over the contact method icon, and then stretching and dragging that icon along the displayed timeline bar.
In the illustration below, Pete’s office phone is set to ring for 30 seconds before the call is terminated or passed on to another object.
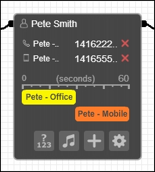
A Person object may be configured with multiple contact methods by clicking the  icon. In the illustration below, a second contact method for Pete has been added, that being a mobile phone (called “Pete - Mobile”). The multiple contact methods act as a hunt group, and the ring times and sequences are fully configurable. In the illustration below, Pete’s office phone is set to ring for 30 seconds, with his mobile phone starting to ring thereafter if the office phone has not been answered. If, after 60 seconds, neither the office nor mobile phones are answered, the call is terminated or passed on to another object such as voicemail.
It is important to note that ring times and ring sequences may be changed by stretching and dragging the contact icons along the displayed timeline bar. Note that as the length of the contact icons are modified, there is an indicator showing the actual ring time associated with the contact method.
The configuration parameters for an existing contact method may be edited by clicking on the listing of that contact method to open up a configuration dialog box.
Existing contact methods may be deleted by clicking the  icon next to each listing.
Call Answer Confirmation - The Person object includes a Call Answer Confirmation option for Land and Mobile contact methods. If this feature is enabled, then calls forwarded to the landline or mobile device may not be answered until a specified code is entered on the phone keypad. When receiving an incoming call, the user will automatically be prompted to enter a code via an automated message, such as "Press 1 to accept the call". If the correct key is not pressed within 5 seconds, then the call will be directed back to your Telobal logic for further processing, and may be forwarded to other voice objects such as alternative contact persons or your office voice mailbox. By using this feature, incoming calls are prevented from reaching unsuitable destinations on unanswered calls, such as your private voice mail.
The Call Answer Confirmation feature is accessed by clicking on the  icon, displaying the configuration window as shown below.
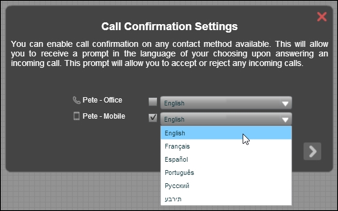
All of the configured Land and Mobile contact methods for this Person object are listed, and each contact method may be individually enabled or disabled to include the Call Answer Confirmation feature. The message prompting the user to enter a key code may be selected from six languages, with the options being English, French, Spanish, Portuguese, Russian and Hebrew. If Call Answer Confirmation has been enabled for a Person object, then the feature icon  is highlighted in blue.
Playlists - The Person object includes the ability to configure playlists, so that pre-recorded music, messages, commercials or any other sound clips may be played to callers while they are waiting for their call to be answered. Clicking on the music icon  on the Person object allows the user to create playlists and to add sound files to those configured playlists. Note that sound files to be uploaded must be in .mp3 or .wav format.
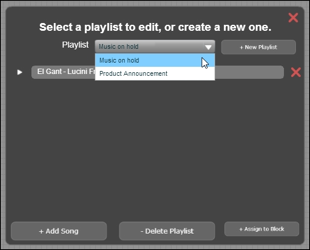
Multiple playlists may be created, and each playlist may have many sound files which are played successively and repeatedly to the callers on hold. In the figure below, two playlists have been created: "Music on hold" and "Product Announcement".
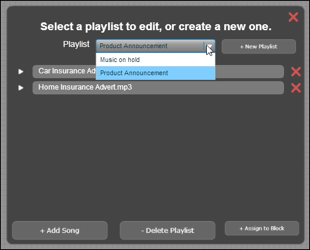
Songs, messages and other sound clips may be added to the playlists by clicking on the  button. Playlist items may be deleted by clicking on the
  icon next to the listed item. To play back and listen to any playlist item, click the arrowhead icon next to that item. Playlists are activated by clicking on the
  button. Note that only one playlist may be activated at any one time. Once a playlist has been assigned to a Person object, then the music icon on that object is highlighted in blue to indicate that a playlist is active.
A simple usage example of the Person object is shown below, where an incoming call is directed to “Pete Smith”. If the call is unanswered, then that call is forwarded to voicemail.

Voicemail
Voicemail is a mailbox in which callers may leave voice messages, which are then immediately sent to a specified email address on termination of each call.

The information to be entered for this object is:
- The email address to which the voicemail should be sent.
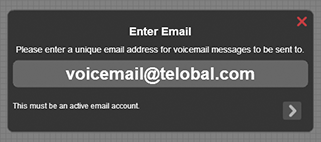
- A voice message that should be played for the caller. Note that this message may either be recorded directly, or may be uploaded from an existing file that is in the .mp3 or .wav format.

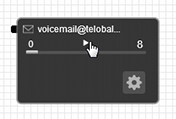
Follow the simple instructions to either record or upload a message. Once the message is in place, its length in seconds will be displayed on the right-hand side of the configured Voicemail object. To play the message back, click the arrowhead icon seen on the message timeline.
Conference
The Conference object allows multiple callers to partake in a conference call.

The information to be entered for this object is:
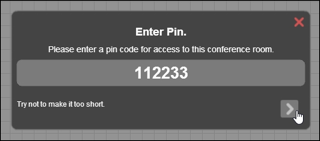
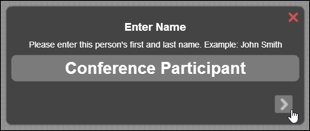
- A PIN code for accessing the conference room, with a minimum length of three digits. All callers wishing to take part in the conference must enter this PIN code correctly.
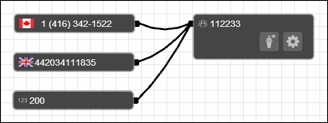
A simple usage example of the Conference object is shown below, where multiple international phone numbers as well as an internal number provide access to the conference facility.
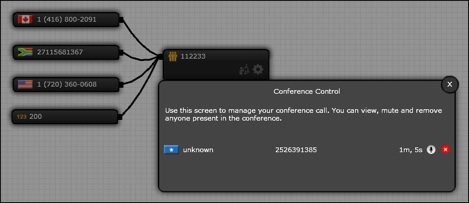
Telobal™ includes real-time management of conferences, allowing you to view the names and phone numbers of the participants and also to mute (by using the  button) and remove any participant (by using the
  button).
Fax
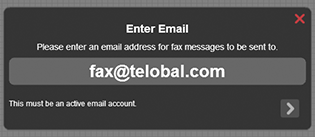
The Fax object allows faxes to be received and to be forwarded to an email address.

The information to be entered for this object is:
- The email address to which the received faxes should be sent.
Blacklist
The Blacklist object is used to block incoming calls received on specified phone numbers. If the calling number matches a blacklisted phone number, then a pre-recorded system status message will be played to the caller and the call will be disconnected.

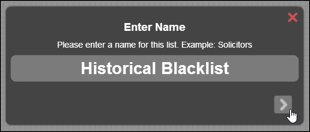
The information to be entered for this object is:
- The name of the blacklist.
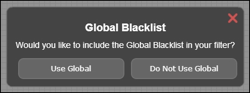
- The option to include the Global Blacklist (an international list of blocked numbers) as a call filter.
- Phone numbers that should be included in the blacklist filter by clicking on the
 sign and entering the phone number in E.164 format:<CountryCode> <City/AreaCode> <LocalNumber>
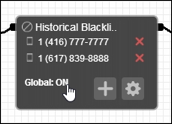
Phone numbers that have been added to the blacklist may be deleted by clicking on the  sign adjacent to that number.
The inclusion of the Global Blacklist may be simply enabled and disabled by clicking on the Global: ON/OFF status on the Blacklist object.
A simple usage example of the Blacklist object is shown below, where the blacklist filter is applied to all incoming calls before those calls are processed by the company voice menu.

Dial Tone Access
The Dial Tone Access object is used to provide outbound dialing access from the Telobal™ system. Typically, this object will be connected to Phone Number or Internal Number objects, and users calling those numbers will be able to make outbound calls after providing a PIN code. If the PIN authentication is successful, then a dial tone is presented and the user may dial out, with phone numbers being entered in E.164 format (country code + network + number). This methodology is also known as DISA (Direct System Inward Access).
The information to be entered for this object is:
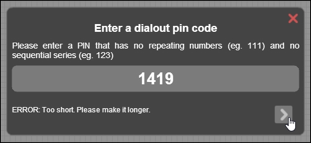
- A PIN code, of minimum length 4 numbers. This code must be correctly entered by the caller before a dial tone is presented for outbound calling.
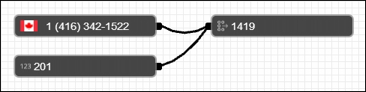
A simple usage example of the Dial Tone Access object is shown below. Calls made to the Phone Number or Internal Number objects will reach the Dial Tone Access object, and allow that caller to make outbound calls after providing the configured PIN code.
Notification
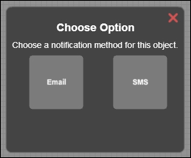
The Notification object is used to provide alerts via SMS or email when a specified event occurs. For example, you may wish to be notified via SMS when a caller joins a conference or when a fax is received.

The information to be entered for this object is:
- The name of the Notification object.
- The notification method (either email or SMS).
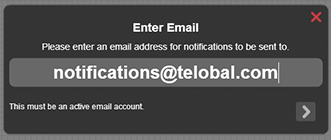
For notifications via email, a valid email address must be entered.
For notifications via SMS, a valid phone number must be entered in E.164 format:
<CountryCode> <City/AreaCode> <LocalNumber>
The country code is 1-3 digits long, while the city/area code and local number length can vary. Some examples of phone numbers in E.164 are 14162223333 for Toronto, Canada and 60321345678 for Kuala Lumpur, Malaysia.
Please note that any notifications sent via SMS will be automatically billed at a rate equivalent to two minutes of voice calls according to your pricing plan.
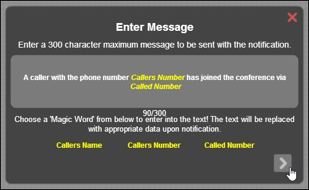
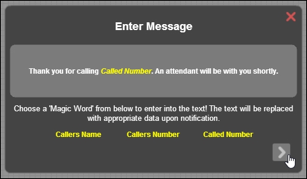
Customized text for the notification email or SMS may be entered (up to a maximum of 300 characters), with auto-fill fields (caller's name, caller’s number and called number) available so as to provide additional important notification details. These fields are inserted into the text by clicking on the required auto-fill field.
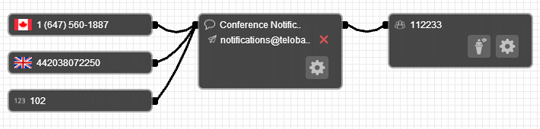
A simple usage example of the Notification object is shown below. Calls made to any of the Phone Number objects are forwarded to the conference room, with notifications being automatically issued each time a participant joins the conference.
Time Routing
The Time Routing object allows incoming calls to be forwarded to different objects, depending on user-defined day and time specifications.

This object includes flexible time rules, and call routing is based on a simple “Yes/No” logic. The Time Routing object must be connected to two child objects such as Person or Voicemail objects to which calls are forwarded according to this “Yes/No” logic. When the cables to the child objects are generated, they are automatically labeled "Yes" and "No" respectively. The “Yes” option defines the routing of calls if a day/time match occurs, and the “No” option defines the routing in the case of a failure in the day/time match. In the figure below, calls that are received within the period matching the configured day/time parameters are forwarded to the Person object "Mike Brown", otherwise the calls are sent to the Voicemail object.

The information to be entered for this object is:
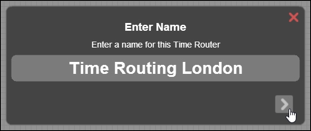
- The name of the Time Routing object.
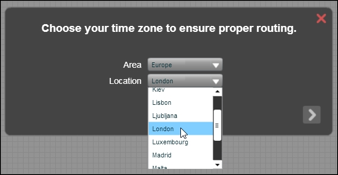
- The relevant time zone for which the configured time rules will apply.
- The time routing logic. Day/time rules are created for each day of the week, defining the start and stop times for which incoming calls will be routed according to “Yes/No” logic. For each time rule, a start and stop time must be configured, and then each day to be included in this time rule must be selected by clicking on that day. The days that are included in the configured time rule are highlighted in blue. In the figure below, incoming calls received on Monday to Friday from 08:15 to 17:00 are sent to the object connected to the cable labeled "Yes", otherwise the calls are forwarded on the "No" cable.

Once a Time Routing object has been configured, clicking on that object displays current day/time rules that have been are created. Each Time Routing object may have multiple time rules, and additional rules are created by clicking on the  icon on the object.

In the figure below, an additional time rule has been created, with incoming calls received on Saturday from 09:30 to 12:00 being sent to the object connected to the cable labeled "Yes".

Existing time rules may be modified by clicking on the displayed rule so as to open the time rule editing window. If necessary, existing time routing rules may be deleted by clicking on the  icon next to that rule.
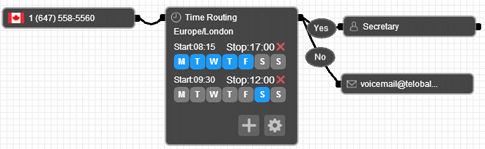
A simple usage example of the Time Routing object is shown below. The configured time rule specifies that from Monday to Friday between the hours of 08:15 and 17:00 and on Saturdays from 09:30 to 12:00, incoming calls are sent to the secretary. At all other times, calls are sent to voicemail.
Caller Routing
Caller Routing allows incoming calls to be forwarded to different objects, depending on the originating phone number.
Caller Routing implements a simple “Yes/No” logic based on whether or not the originating phone number matches a phone number listed in the Caller Routing object. This object must be connected to two child objects such as Person or Voice Menu objects to which calls are forwarded according to this “Yes/No” logic. When the cables to the child objects are generated, they are automatically labeled "Yes" and "No" respectively. The “Yes” option defines the routing of calls if the originating phone number matches a phone number included in the Caller Routing object, and the “No” option defines the routing in the case of a failure in the phone number match.

The information to be entered for this object is:
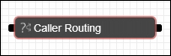
- The name of the Caller Routing object.
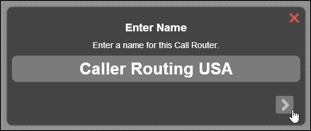
- The phone number/s required for the routing logic. Clicking on the
 icon on this object allows you to add phone numbers for the routing logic.
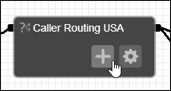
Phone numbers must be entered in E.164 format:
<CountryCode> <City/AreaCode> <LocalNumber>
and there may be multiple phone numbers per Caller Routing object.
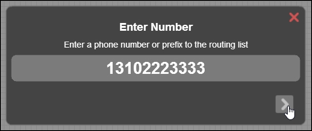
Phone number prefix codes may be used as wildcards (minimum length of 2 numbers), which is useful for the routing of calls on a geographic basis.
If necessary, phone numbers previously added to the Caller Routing object may be deleted by clicking on the  icon to the right of the number.
A simple usage example of the Caller Routing object is shown below. If the incoming call is received from a number listed in the Caller Routing object (1-212-555-6789 or prefix 1-518), then the call is forwarded to Mike Brown (connected to the “Yes” cable); otherwise, the call is forwarded along the “No” logical cable to the secretary.

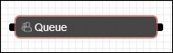
Queue
The Queue object causes incoming calls to be placed in a queue before those calls are passed on to a queue member. This allows a large number of calls to be handled, such as in a call center. The Queue object includes a ring strategy that is used to define how the calls are divided between queue members. Music or other messages may be played to callers while they are waiting in the queue.
A special feature of the Telobal Queue object is that the name of the queue is passed as part of the Caller ID to queue members using SIP devices. This feature is useful in the case of an agent who serves multiple queues (such as sales and technical support), and it allows that agent to determine from which queue the call is being forwarded.
The Queue object is connected to multiple queue members to whom calls are forwarded as per the defined ring strategy. It is important to note that when connecting cables from the right hand side of the Queue object to other objects, all cables are automatically labeled “Member”. However, there is an option to generate a “No Answer” cable, which should be connected to the object (such as voice mail) to which calls are to be forwarded if the queue wait time exceeds the maximum configured value.
The caller also has the option of exiting the queue at any time by pressing the "0" key on their dial pad. You may inform callers of queue instructions by inserting a Voice Menu or Playback object with a voice recording in front of the Queue object.
The information to be entered for this object is:
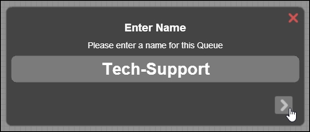
- The name of the Queue object. Note that this field must consist only of printable characters, as the name appears as a prefix in the Caller ID when calls are forwarded from this object to queue members using SIP devices.
- The ring strategy to be used for this queue.
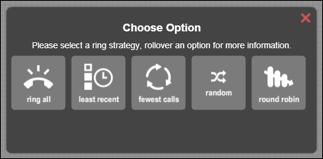
The options for the ring strategy are as follows:
- Ring all - ring all available queue members simultaneously until one answers.
- Least recent - ring the member who was least recently called by this queue.
- Fewest calls - ring the member with the fewest completed calls from this Queue object.
- Random – randomly ring a single queue member.
- Round robin – ring members using a round robin policy, noting the last member who answered a call.
Clicking on a configured Queue object displays the details of that object, including an icon  which allows advanced configuration of queue parameters.
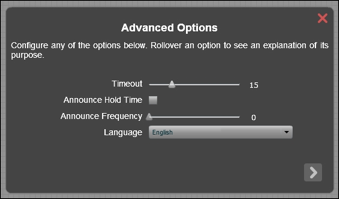
The Timeout parameter defines the ring duration (in seconds) for each member in the queue before the call is passed to the next queue member. If this value is not modified, then the default ring duration is 15 seconds.
If the Announce Hold Time feature is enabled, then automatic, periodic announcements will be made to the caller indicating the time period for which they have been on hold. The Announce Frequency parameter defines the time (in seconds) between such announcements, and the language for these announcements may be English, French, Spanish, Portuguese, Russian or Hebrew.
Clicking on a configured Queue object displays the details of that object.
It is important to note that the maximum time that a caller may wait in a queue without having the call serviced is configurable for between 0 and 15 minutes (with a resolution of 15 seconds), and may be changed by stretching and dragging the timer icon along the displayed timeline bar. If a call is not serviced within the configured time, then that call is forwarded to the object connected to the “No Answer” cable as described below.
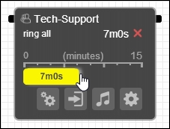
The queue logic for a call wait time that exceeds the maximum configured timeout value is implemented by clicking on the  icon. By doing this, the next cable that is generated from the Queue object will be labeled “No Answer” and should be connected to an object (such as voice mail) to which calls are to be forwarded if the queue wait time is exceeded.
Pre-recorded music, commercials or any other sound clip may be played to the callers while they wait in line for an available queue member. Clicking on the music ico  on the Queue object allows the user to create playlists and to add sound files to those configured playlists. Note that sound files to be uploaded must be in .mp3 or .wav format.
Multiple playlists may be created, and each playlist may have many sound files which are played successively and repeatedly to the callers on hold. In the figure below, two playlists have been created: "Music on hold" and "Product Announcement".
Songs, messages and other sound clips may be added to the playlists by clicking on the  button. Playlist items may be deleted by clicking on the
  icon next to the listed item. To play any listed playlist item, click on the arrowhead icon next to the listed item.
Playlists are activated by clicking on the  button. Note that only one playlist may be activated at any one time. Once a playlist has been assigned to a Queue object, then the music icon on that object is highlighted in blue
  to indicate that a playlist is active.
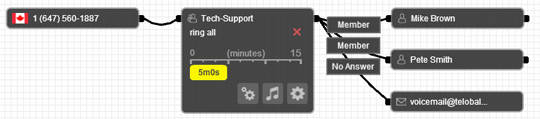
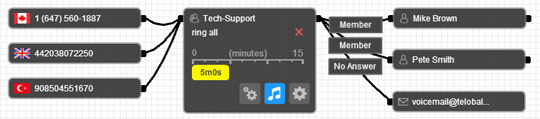
A simple usage example of the Queue object is shown below. Incoming calls are forwarded to the Queue object, which in turn cause both Mike and Pete’s phones to ring simultaneously. If any incoming calls remain in the queue for more than 5 minutes (that is, the calls are unanswered), then those calls are sent to voice mail.
Record
The Record object allows phone calls to be recorded. The call contents are sent to a predefined email address as an attachment immediately after the termination of each call.

The information to be entered for this object is:
- A valid email address must be entered to which the call contents will be sent.
A usage example for the Record object is shown below, where this object is inserted between a Phone Number and Person object so that all incoming calls forwarded to Mike Brown are recorded.

Playback
Playback allows you to create a voice recording for later playback to callers. This object also functions as a text-to-speech utility.

The information to be entered for this object is:
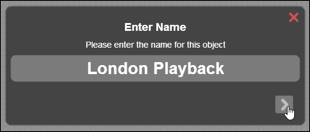
- The name of the Playback object.
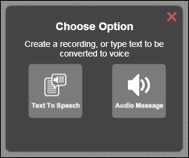
- An option to record/upload an audio message or use the text-to-speech utility for creating a voice message.
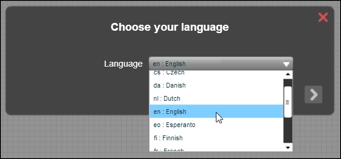
The text-to-speech option allows you to enter text that will be converted into speech. Over forty different languages are currently supported, and auto-fill fields (caller's name, caller’s number and called number) are included so as to provide additional important details.
Firstly, the language into which the entered text should be converted is selected.
A text message is entered that will be converted to speech. Note the availability of optional auto-fill fields.
If a voice recording is to be created for later playback, the “Audio Message” option must be selected. An option is provided for creating a new recording, or for uploading an existing voice message.
In order to record a message, the simple instructions should be followed. On completion of a recording, the message will be automatically uploaded to the Telobal™ server.
Alternatively, a voice message file in .mp3 or .wav format may be uploaded.
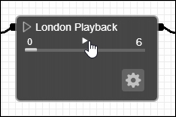
Once the voice message has been recorded or uploaded, its length in seconds will be displayed on the right-hand side of the configured Playback object. To play the message back, click the arrowhead icon seen on the message timeline.
A usage example for the Playback object is shown below, where a voice message is played to the caller, following which the call is passed to a Person object (“Mike Brown”) for further processing.

Moving Objects Around the Workspace
Once objects have been positioned on the workspace, they may be moved around and re-positioned as required. Each object may be moved individually by selecting the object with the mouse (depressing the left-hand button), and then dragging that object to the required position on the page. Once the object is in the required position, then the mouse button is released. Note that if the object being moved is connected to other objects, then the connecting cables will be "stretched" and re-positioned in order to preserve the PBX configuration.
Telobal also allows users to drag multiple objects around the workspace in groups using a single mouse movement, allowing easy maintenance and modification of complex voice systems.
Groups of connected objects may moved in two different ways:
- Move all connected objects - holding down the "Shift" key while dragging a specific object, moves all the objects that are logically connected to that selected object, including those objects that are not directly connected (are indirectly connected via secondary, tertiary, etc. cables). The relative positions between all the objects are preserved.
- Move all child blocks - holding down the "a" key while dragging a specific object, moves all the objects that are connected to the right-hand side of that selected object, including those objects that are not directly connected. The relative positions between all the child objects are preserved.
In the diagram below, we wish to move all of the connected objects to a position lower down on the workspace, and yet preserve the relative positions between all of the objects.
In order to achieve this, any object in the group is selected (in this case the Voice Menu object), the shift key is depressed, and the selected object is dragged to its required position. All of the connected objects are repositioned on the workspace, while preserving their original relative positions.
In order to achieve this, select any object in the group (in this case the Voice Menu object), hold down the shift key, and drag the selected object to its required position. All of the connected objects are repositioned on the workspace, while preserving their original relative positions.
Alternatively, we may wish to reposition the Voice Menu object and all of its child objects (objects connected to the right-hand side of that object). In this case, the Voice Menu object is selected, the "a" key is depressed, and this object is dragged to its required position. All of the connected child objects are repositioned on the workspace, but parent objects (in this case the Phone Number object) do not move.
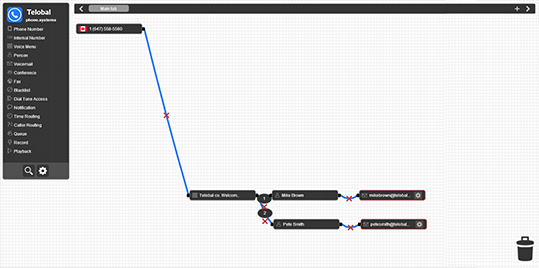
In order to facilitate more complex voice systems, the actual workspace canvas is significantly larger than may be viewed in a single page. The canvas position may be moved by placing the mouse at any blank position on the workspace, depressing the left-hand mouse button, and then dragging the mouse in the required direction. In the diagram below, the Palette menu has been minimized so as to gain a larger workspace. Then the workspace canvas has been "dragged" to the left, moving the existing PBX configuration in the same direction and freeing up the right-hand side of the workspace for further assembly of Telobal objects. The workspace canvas may be "dragged" in multiple directions, increasing the extent of the workspace in both the horizontal and vertical planes.
Note that the X and Y coordinates of the current workspace are displayed at the top right-hand corner of the screen when dragging objects off the default workspace position, so as to assist in the navigation process.
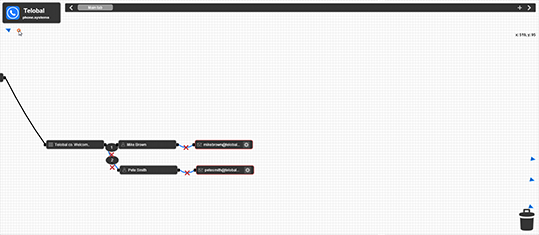
Blue arrowheads appear at the edge of the page when "dragging" the workspace canvas. These arrowheads indicate the number of objects that are not currently visible due to them being "outside" the currently displayed portion of the canvas.
The Workspace Tab Menu and Multiple Pages
Telobal™ allows you to split up your voice system into logical groups and functions that may be arranged over multiple workspace pages. This feature is very useful when building complex voice systems, such as a PBX for a multi-branch business. The various workspace pages are accessed via the tabs on the Workspace Tab Menu, and the tabs may be labeled so as to define the functionality of each workspace page.
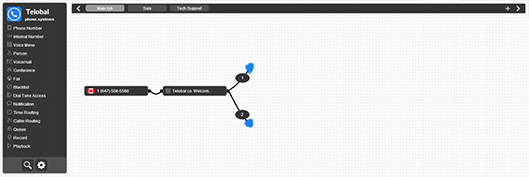
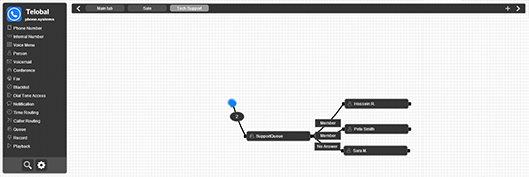
The figure below serves as a simple illustration of the Telobal™ workspace tab feature. In this PBX configuration, a voice menu directs incoming calls to either a sales or technical support queue, and then these calls are further distributed to agents.
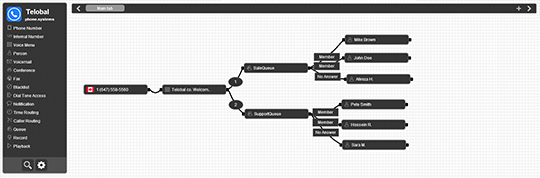
This PBX configuration may be split-up into three separate logical functional groups:
- The main PBX logic consisting of the incoming phone number and the voice menu
- The PBX logic for the "sales" division
- The PBX logic for the "tech support" division
Firstly, new workspace pages must be added to which the "sales" and "tech support" logic will be moved. These additional tabs (and associated workspace pages) may be generated by clicking on the  icon at the top right-hand edge of the Workspace Tab Menu.
Note that a new tab  has been created, presenting a blank workspace. The original Telobal logic as defined above was assembled on the
  workspace, and may be accessed by clicking on that tab. The tab currently labeled as "New Tab" is then re-named "Sales", as this workspace page will contain the PBX logic for the "sales" division. This is done by double-clicking on the label on the Workspace Tab Menu and then editing the name of that tab. An additional tab is created and then renamed "Tech Support". Note that the may also be renamed if desired.
In the figure below, the three tabs are shown: "Main Tab", "Sales" and "Tech Support".

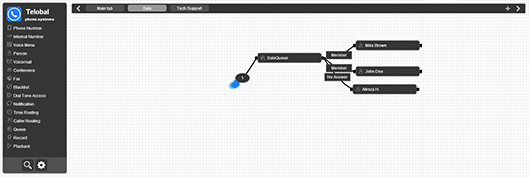
The next step is to move the "Sales" Queue object and all of its child objects (objects connected to the right-hand side of that object) to the workspace page accessed by the "Sales" tab. In order to achieve this, select the "Sales" Queue object, hold down the "a" key and drag the "Sales" Queue object up to the "Sales" tab. Once that tab becomes highlighted, release the mouse key and all of the sales voice logic will now be moved to the "Sales" workspace page as shown below. The PBX objects may be repositioned on the workspace as required.
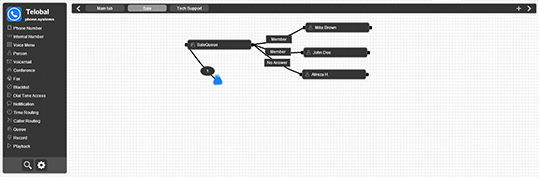
Note that logical connectivity between the voice objects on different workspace pages is represented by a cable terminating in a "blue cloud". By clicking on this "blue cloud", the workspace page associated with this connection is displayed.
Similarly, the "Tech Support" Queue object and all of its child objects are moved to the "Tech Support" tab workspace, completing the separation of this voice logic into functional groups.
Once this process has been completed, there are three separate workspace pages:
- The "Main Tab" contains the main PBX logic consisting of the incoming phone number and the voice menu.
- The "Sales" tab which includes all of the objects associated with the sales function.
- The "Tech Support" tab which includes all of the objects associated with the support function.
Existing tabs may be deleted by double-clicking on a highlighted tab, and then clicking on the "X" on the right-hand corner of that tab.

In addition, tabs may be moved to different positions on the Workspace Tab Menu by clicking on the required tab and then dragging that tab along the Workspace Tab Menu.
Note that the visibility of the Workspace Tab Menu may be toggled on and off by using the  icon found in the Advanced Settings menu on the Palette.
Transferring Calls Using Telobal™
Telobal™ allows you to transfer calls anywhere within the PBX system such as to another employee, to the operator or to queue attendants, even if they are in different locations. Both “blind” and “attended” transfers are supported, allowing you to transfer the call with or without first speaking to the person to whom the call will be transferred.
The Telobal™ call transfer feature is available for connected SIP devices, PSTN and mobile phones, VoIP (ITSP) as well as the Telobal™ Mobile Application, and uses assigned Internal Numbers for call transfers.
Blind Transfers
Blind transfers are used if the call should be transferred without first speaking with the person to whom the call will be forwarded. These transfers are achieved by pressing *1 on the phone keypad, or by using the transfer (xfer) button if available on an IP or soft phone.
- If a transfer (xfer) button is available, answer the incoming call, press the transfer button, enter the required Internal Number (extension) and the call is immediately transferred.
- If a transfer button is not available, answer the incoming call, enter *1 on the dial pad and then enter the Internal Number (extension) when prompted. The call will then be transferred. Note that the Internal Number should be entered immediately after the transfer prompt.
While the call is being transferred, on-hold music is played to the caller. Once that call has been answered, the call is automatically disconnected from the person who originally answered that call.
Attended Transfers
Attended transfers are used if the call should be transferred only after first speaking with the person to whom the call will be forwarded. These transfers are achieved by pressing *2 on the phone keypad, or by using the transfer (xfer) button if available on an IP or soft phone.
- If a transfer (xfer) button is available, answer the incoming call, put that call on hold, call the required Internal Number (extension) on a second line, speak with the person to whom the call is to be transferred, press the transfer button and the call is immediately transferred. Note that the call may have to be manually disconnected from the first line if your device does not do this automatically.
- If a transfer button is not available, answer the incoming call, enter *2 on the dial pad and then enter the required Internal Number (extension) when prompted. Once the call has been answered and you have spoken with the person to whom the call is to be transferred, simply hang up and the call will automatically be established between the caller and the required extension.